Hello. My name is Raghu. I make models as a hobby. More precisely, I build railway locomotive models from scratch, using all kinds of material, mostly recycled paper, waste plastic and bits of metal – indeed, anything that can be fashioned into a locomotive part.
Since I love the railways with a fierce passion, making models of railway locomotives is a natural obsession. I am also affected with other afflictions; such as collecting and restoring vintage and classic cars. I am an insatiable collector of transportation related ephemera as well, and all kinds of artifacts, from old clocks to radios to oil lamps.
I have had a lot of fun doing all this; I would not have lived life any other way. I hope I can persuade some of you to indulge in your mad passions, whatever they might me, but ideally, making models of railway subjects.
My own romance with model building started early in life. I grew up in a bustling and busy household, the youngest child in a family of six. While love was in abundance from parents and older siblings, they were preoccupied with their interests and obligation too. I spent a happy childhood, being fairly unsupervised and left to my devices. If I felt bored, I had to deal with that on my own. We were not poor, but not too rich either; a large extended family had to be supported. Toys were rare indulgences. If I wanted something very badly, there was no other way to obtain it, other than attempting to make it myself.
A girl entered my life, when I was about eight or so. She lived close by and we became good friends. A tough and aggressive lass, she was my age, but bigger than me and bossy. With the natural wariness of boys of eight, who considered women as a necessary evil – I had five older sisters – I treated her with some trepidation and caution. However, what tilted the balance in her favour was that her father; recently returned from the UK, had brought back a twenty volume Children’s encyclopaedia, published by Popular Science. I sat on her sofa, often refusing to join in games of hide and seek, absorbed in those books, utterly fascinated by pictures of steam locomotives, aircraft and cars.
I made crude drawings of what I saw – mobile phones and cameras were in the realm of science fiction back in the mid sixties - and rushed back home, to cut up cardboard to make models of locomotives and cars. Any cardboard was grist to my mill, from old school notebook covers to toothpaste boxes,
Then there was the Reader’s Digests, a staple of homes those days. My parents have subscribed to them since it was launched in India in 1954. I waited with bated breath for the latest magazine to arrive in the post. I savoured the advertisements of automobiles and the occasional locomotive and they added to the list of desirable subjects of which I would make models.
Sadly, my childhood collection of models would not last long. Motive power was impossible; in the small town in which I lived one could not buy motors and dry cells were unaffordable. So, my collection of models remained stationary. Flimsy, they were, and most were destroyed when the summer holidays ended, and I had to get back to school, in the monsoon weather.
The fascination with model making remained in the recesses of my mind, though there was little time to indulge in this hobby, when I pursued academics and then, a busy career. I made models in balsa wood, paper and paper pins, largely of vintage sports cars. They were, by my standards of today, though pretty, rather crude. There were very few references to go by and sometimes I made models with just one or two pictures of the subject available.
When I got a job, I pursued the hobby whenever I got the time, particularly during postings in remote places. Progress was slow. A posting in Bangalore led to a brief resurgence of interest, as I met kindred souls in the hobby. A club was formed, named the Modelers of Bangalore. Sadly, a good friend who was a guru of techniques in model making, passed away young. Traumatised and saddened by his passing, I stopped model making.
Like with many others, professional work consumed me. It was a paradox that when kits and models became more affordable, I did not have the time to pursue the hobby. Tools were bought, a tiny worktable was organized, but yet, work on models happened only in fits and starts, as I sank into the happiness of being a husband and a father. Abandoned models filled up cardboard shoe boxes, paints dried in their bottles, as they were stashed away for a later day.
All that changed when I was posted to Delhi in 2004, away from my family, for five years. However busy I attempted to be in office, there was no running away from facing loneliness in the evenings and on holidays. I am friendly, but not gregarious. And I abhor television.
The National Railway Museum is easily one of my favourite places in India. As a student in the seventies, I had often bunked college to visit the Museum and watch the first locomotives being shunted in, supervised by that dedicated enthusiast, Mr. Satow. The museum became a regular watering hole; I visited it nearly every weekend.
Then I met Mayank Tewari.
Mayank is a jolly chap. I choose my words carefully here; lest I get more effusive. Let me put it this way, if he were not around, I would probably never have gotten back to model making with the same intensity as of now. Mayank organized a group that he loosely termed the ‘Friends of the Rail Museum’, and we spend many happy days planning and helping the museum conceptualise its expansion and refurbishing. The National Rail Museum has a delectable collection of models and I set about the task of documenting them, photographing their features and observing how they were built. The passion of model making was rekindled.
My first railway model in recent times.
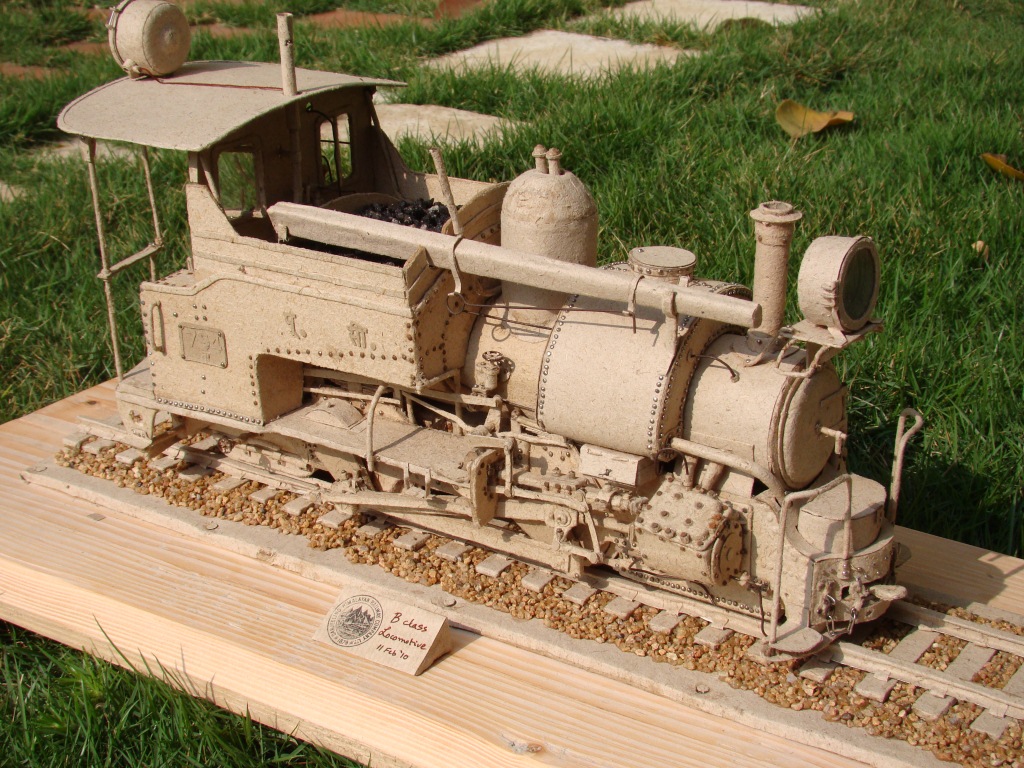
I love the DHR B Class locomotive and its busy, functional looks. I hate it being called a toy train; mere miniaturization doesn’t make something a toy. By the same yardstick, every Rolex watch is a toy too! The fascination with the locomotive initially drove me to an internet search for photographs – and there are plenty of these about now. Then came the idea of making a model of the loco. My opportunity came when Mayank Tiwari the Director of the National Rail Museum, Delhi wanted me to run a class on the basics of rail modeling for the Museum Weekend in November 2007. I pondered over the offer and decided that since a lot of children would come to the museum, I should keep the workshop to the simplest basics of model making. So brass was ruled out and I veered towards using paper for the model. It was in Mayank’s room, a few days before the Weekend that I ran into Mahima Mehra. She runs a unit that manufactures and sells hand made paper and one of her specialities was paper made from elephant dung. I saw rolls of this paper that she was providing to Mayank for the Museum gift shop and it struck me that this would be an interesting material to use for the DHR model. So there was born the project; to make a model of the DHR using handmade paper and the most basic and simple of tools.
The stall I set up in the Museum evoked a lot of interest. What surprised me was the number of adults who flocked around. However, the conversations did not allow the model to progress much during the three days of the Museum Weekend. Model making is a misanthropic pastime and one requires solitude, at best accompanied with some classical music in the background.

Surfing through pictures on the net, I observed that each B class locomotive varied from the others in matters of detail, such as the shape of the coal scuttle and some embellishments on the body. Which one would I model? It was then that I saw a lovely picture of B-794 on the net. The engine was gloriously dirty and looked like it had worked up a nice lather of sweat. Yes, this is the engine that I would model.
Unfortunately, B-794, a later model B class engine manufactured by the Baldwin Locomotive Company, no longer lives in Darjeeling. In a fit of misguided enthusiasm, it was transported to Matheran, for the centenary of the latter railway, where it was garishly prettified and renamed as the ‘Neral Queen’. The locomotive was unable to negotiate the much tighter curves in Matheran and was used just once. It now lies there, lonely and far away from Darjeeling.
To come back to my model, I started with cardboard cutouts for the chassis side members and the wheels, laminating them with the dung paper. Lining up the chassis frames and making up the basic shapes of the boiler, cabin and the saddle tank was deceptively quick. This is nearly always the case. It is the detailing that takes an agonizingly long time.


The mock-up of the basic shapes were followed by the first steps in detailing. I started with the leaf springs, making them of laminated paper and driving a paper pin through them to provide strength and bracing. The ends of the leaf springs were made from straightened paper clips.


The smoke funnel on the DHR tapers ever so slightly towards its base. I got a nice match from a cheap pen cap. As I started working with the paper, I began to understand its characteristics. The paper can be quite strong when laminated and if wetted with diluted white glue, can even take compound curvatures. I also noticed that the consistency of the paper varied from batch to batch. While the first batch must have come from a health freak elephant that consumed a lot of fibre, the second was obviously from a rather more laid back one, which seemed to have had a preference for heavy milk shakes!

The saddle tank was made from laminated cardboard, but I had to discard it and make another, because it began to warp irreparably.

The most boring part of the model was the number of rivets that had to be represented. I used paper pins, finally consuming more than 1500. The saddle tank alone needed more than 250 of them. I began to set targets for rivets, upto 50 per day, to get over this. The rivets were also of different sizes and I had to file down paper pins to represent the smaller ones, or to use them as hexagonal headed bolts, particularly on the cylinders.

Over time, the model started to take form, with more and more detailing being added. The running gear and cylinders took up the entire spare time of a month. I began to use pins for doweling parts together. Along the way, I also realized that rolling paper over stiff wire, to use as railings is not a bad idea.

Scratch-builders are a crazy lot, because they are always on the lookout for material that they can use for their models. I found shampoo bottle caps ideal for the headlights. Apart from the paper, pins and shampoo bottles, other things that went into the model included a beer can, cut into strips to provide stiffening for some parts, a bottle cap for the steam pressure gauge and an empty ball point refill for the whistle.
The steam pressure gauge proved to be a challenge. All engines in India had converted to Kilogrammes per square centimeter and had hand painted faces. After getting in touch with Mr. Adrian Shooter, who owns a B Class engine in the UK, I was able to obtain pictures of the dial on his locomotive from the former director of the DHR Mr. Subrato Nath. Some heightening of the contrast through a simple photo editing software and a contact print gave me the right size of dial – 13 mm in diameter, which can be read with a magnifying glass.

Adding more and more details as I went along became a pleasure. A whole day of work would not make the model look very different, but it was fun to show off to my wife and son by evening, the little details added during the day – such as the opening sand box and the tool boxes fitted below the saddle tank The fitting of the headlights, wiring them and fitting the front and rear hooks on chains made from paper clips were especially satisfying. The ‘coal’ was fashioned from a bit of asphalted gravel, pounded into the scale size and sieved.

Nearly the last thing to be done was to make tiny valve cocks. I first made a jig on which I wound sewing thread to create six radiating spokes, each consisting of a pair of tightly stretched cords. The outer ring of each gate valve, fabricated from metal wire, was slipped underneath the crossed threads on the jig and the whole thing glued together using super glue. Paper was carefully pasted over the string spokes, to create the six spokes of the valve cocks. They look very nice, particularly inside the engine bay.

Finally, the track and sleepers were fashioned out of laminated paper. A sign made from a contact print of the old DHR logo, completed the model. The model cost less than Rs. 300/- to make, largely in the form of Fevicol glue. Yes. it took me more than 1000 hours to get there, spread over nearly two and a half years.

I would not have been able to make the model if it were not for the help that I received from several enthusiasts. These are Mr. Adrian Shooter, Mahima Mehra, Mayank Tewari, and Subrato Nath, apart from several others who have posted pictures of DHR locomotives on the internet.
What next? Since I loved the YG meter gauge locomotive, I decided that the next project would be a 1:16 scale model of it. Because the B class looked so good in its unpainted elephant dung paper form, I decided I would go the same way with the YG too. However, the YG is far more complex than the DHR B class. Drawings were not available and I would have to measure and dimension out each part myself. Would I rue that decision? Read on, in my next blog.
As I tell my story, I will lead you into the techniques that I use, the ones I am good at, where I am still learning, and what I need to learn next.